


Hello and welcome back to our detail series – today, I’m going to be styling all the details for a wedding day! Follow along as I take you behind the scenes and chat through our process while I photograph wedding flatlay details. As always, if you have any questions, drop them in the comment section and don’t forget to like and subscribe for more!
This month, we are going through styling wedding day details. We have two videos already uploaded so go check those out – we have one with some general tips and another going through a DIY hack when we are in a pinch!
Behind the Scenes
Today, I’m taking you behind the scenes with me. I’m going to photograph wedding flatlay details and I’m bringing you along with me while I style them! It’s actually for Cam’s sister, Shelby, and her fiance, Juan! I am styling their details before the actual wedding day because we are helping to photograph the wedding. I know this is not typically how the wedding day goes, normally there is a ton going on during styling, so I do have a more peaceful time today. Take that with a grain of salt! We have a little bit more time so we can get different camera angles and all of the things!
Styling Everything
I’m going to be styling everything today. They have a pretty simple invitation suite, with no accommodations card or rsvp card. We know when we were starting out, a lot of our couples just had one piece of their invitation suite. Sometimes, they would have an envelope but it wasn’t jazzed up so it wasn’t necessarily something we would include in the flatlay.
If you have any questions, please drop them in the comment section of our video! We love to reply to your questions and it helps inspire future Youtube videos!
Let’s Jump In!
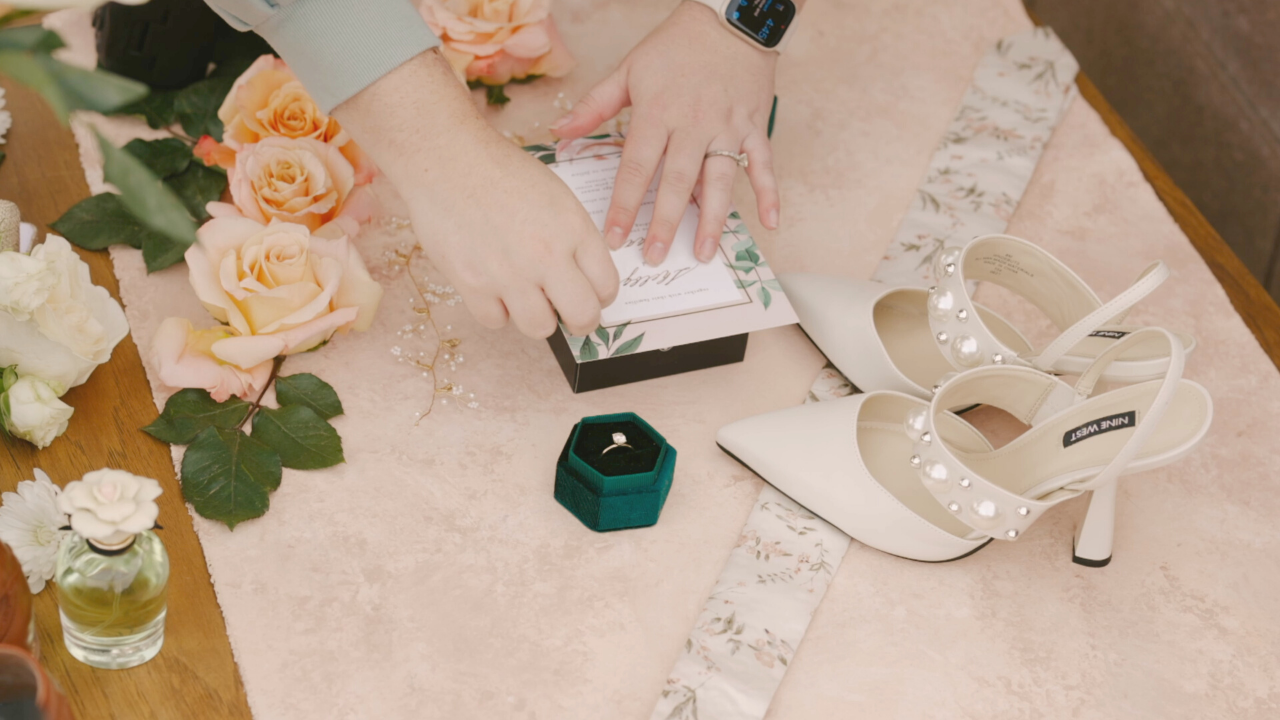
We’re getting started right away with a cologne box that I’m using as a rise for the main invitation suite piece. I knew I wanted to raise it up significantly because we are going to use high florals and so I want that piece to stand out. It’s also the only piece in this invitation suite so I want to make a statement with it.
Next, I’m adding the hair piece on the bottom. I also like to use both sides of the ring box, which I’m using the top for the groom’s band and bride’s band. I’m also adding the tie because I think it adds a really nice pattern.
Styling Mats
I love to photograph wedding flatlay details on Holland Dee Design styling mats. We seriously love them so much! They are hand painted and incredible – we could not recommend enough. Here’s the link to grab the mats for yourself!
Back to Styling Details
Back to styling, you’ll see me add the shoes. I don’t always add the shoes with the invitation suites, I like to keep it paper goods only but because there’s only this one piece, we want to jazz it up a little bit.
For florals, I’m adding in these roses. I love to take them right off the stems as close as possible and then open them up and expand them slowly. One thing you can do when they are still on their stems – you can pull them back and forth in your hands and allow them to open naturally. Then, once I get them down on the styling mat, I open them a bit further.
Next, I’m adding the perfume. I love to use rose leaves, I think they’re really fun and bring great symmetry all while still being organic. I also love them in this instance because we’re balancing the dark greens.

Here is the invitation suite photo!
Bringing in the Rings
Then you’ll see me bring the rings onto the main invitation suite piece. I love to get close ups of the rings, especially if there’s some fun typography on the invitation. I tried a couple different arrangements. At first, I was trying the engagement band inside the grooms band. I love to stand them up if possible, but depending on the size, it doesn’t always work.
Bringing in the Envelope Liner
Next up, I’m grabbing their envelope liner. They actually gave it to us without the envelope, but because it has this really awesome pattern that I think ties into the colors we’re going to use it. Also, the roses that were styled, we can use it in a couple different ways.
First, I’m putting their earrings down. What you have to do with earrings is just move them around and adjust them. I will always take backs off of the earrings, also. These are threader earrings, so I have to play with them to get them to lay the way I want. I decided I wanted to get a shot that’s just the brides details, but mainly the engagement ring with the rest fading into the background. It’s super fun because the envelope liner pattern that’s going to tie everything together.
The Bride’s Vignette
When I photograph wedding flatlay details, I love to do a bride’s vignette. For the bride’s vignette, I’m going to go back in and use the envelope liner again. It brought some fun contrast against the styling mat. I’m trying to balance the rings and I can’t quite figure out what to do with the band because I know the engagement ring is going to be so much higher than everything else. I actually bring in the other piece of the ring box so I can put the band on there. I’m also playing with the threader earrings so they nicely and so they’re on the same level as everything else.
It’s just a game of getting everything to lay nicely and naturally. I’m going to bring the hair piece back in because it brings some fun sparkles. I think it’s totally fine to have a level down because it doesn’t have to be in focus, it just adds a little jazz.
Next, I’m bringing in the shoes. I noticed that there was a little scuff on them, so I scrubbed that off. It’s so important to pay attention to those details now so you don’t have to waste any time during post processing.
Bringing in the Perfume
Then, I’m going to pull in the perfume. I actually didn’t include it in the first main invitation suite. I didn’t like how it was a lighter green and didn’t go well with the darker green. It’s one of those things that they’re almost too close, but not the same, so they clash. It also has a black ribbon on it, which was nothing else we saw in the main suite piece, so it felt a little aggressive. So I’m trying to figure out how I can get it in the brides vignette and have its own moment, but it just didn’t make sense in the full suite piece.
I’m bringing in the florals again. One thing you can see is I’m having trouble getting the floral to stand straight up, which is kind of okay in this image because it’s going to end up looking super natural.
One thing you can do is get floral frogs, which are linked here for you. You can pop the flowers right on top of them and they hold the florals straight up and down.
Here, you can see all of the elements. It’s super fun, gives variety, and also looks natural – like we just threw them together and they naturally fell there.
I’m taking the shoes away – like I said before, I want the perfume to have its own moment, so I’m making a huge floral vignette for this. I’m still using the envelope liner, I liked that and it was tying in all of the elements that we were using, so it made a lot of sense there.
Deconstructing Flowers
At this point, I’m going to start deconstructing flowers. Depending on how I got the florals, whether they were extra buds from the florist or if they were a line item on their invoice as detail florals so they were mine to keep, I’m going to deconstruct them.
As I go, I can start breaking away and doing individual details and start deconstructing the flowers and let petals fall. I love to keep my styling mat clean in between, especially with florals. Otherwise, things will get squished on there and you may ruin your styling mats. Then, I’ll toss the petals around until they lay nicely and a way I like. I find that if I try to place them individually it never looks quite right.
I also love classic shoe pics. The way these shoes laid was so nice. It felt like they were opening up and presenting because of the way the heels are, and then I also got a classic up and down shoe pic.
Ring Vignette
Next, I’ll be doing a ring vignette. I already did one on the envelope liner but I wanted to balance out the envelope liner backdrop with photos with the classic pink. You can see my tossing the petals around and getting a portrait and landscape and they pair nicely for details. And the very final thing I will be doing is a groom’s vignette!
Thank you so much for joining along with me as I photograph wedding flatlay details! We have one more detail styling video coming at you next week, so stay tuned for that!
Hit subscribe on our Youtube channel if you haven’t already!


")


